Why Homemade Mounds Bar Truffles Are Your Next Sweet Obsession
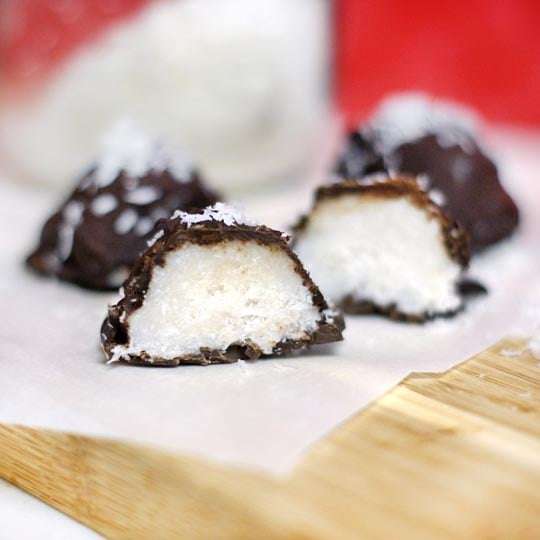
Forget the store-bought candy aisle for a moment and imagine sinking your teeth into a rich, dark chocolate shell that gives way to a creamy, intensely coconut-flavored center. These aren't just any treats; we're talking about incredibly easy
mounds bar truffles, a homemade homage to that iconic candy bar, but elevated. Perfect for satisfying those sudden chocolate-coconut cravings, these two-bite wonders offer all the nostalgic flavor with the added bonus of being crafted right in your own kitchen. Whether you're a lifelong coconut enthusiast or simply seeking a quick and delicious chocolate fix, these truffles are a game-changer, requiring minimal effort and creating hardly any mess.
The allure of making your own truffles lies in the control you gain. You dictate the quality of ingredients, adjust sweetness to your preference, and even customize flavors to create something truly unique. Beyond the immediate satisfaction, there's a certain joy in presenting a batch of these delectable treats, knowing every wholesome ingredient that went into them. These aren't just desserts; they're moments of simple, unadulterated pleasure, perfect for a quiet evening indulgence or a delightful sharing experience with loved ones.
Crafting the Perfect Coconut Core: Ingredients and Techniques
The heart of any great
mounds bar truffle is its luscious coconut filling. Achieving that ideal balance of moist, sweet, and firm is key, and it all starts with the right ingredients and a few simple steps.
First, let's talk about the star: shredded coconut. Opt for *unsweetened desiccated coconut*. While sweetened flakes might seem appealing, unsweetened gives you complete control over the final sweetness, allowing the natural coconut flavor to shine through. The fine texture of desiccated coconut also helps create that melt-in-your-mouth consistency we're aiming for.
Next, the magic ingredient that holds it all together: coconut oil. Beyond its delightful aroma and heart-healthy benefits (thanks to beneficial medium-chain triglycerides), coconut oil is crucial for the structure of your truffles. It's solid at cooler temperatures, which means it will firm up beautifully when chilled, giving your coconut mounds that satisfyingly solid, yet creamy, texture.
For sweetness, honey is a wonderful choice, lending a subtle floral note and natural moisture. Alternatively, if you're aiming for a specific color or flavor profile, consider other liquid sweeteners. A touch of Golden Syrup, for instance, imparts a lovely subtle caramel essence and a beautiful golden hue to your centers, reminiscent of old-world confectionery. If you prefer a pure white core, light corn syrup is an excellent neutral alternative. Don't forget a splash of good quality vanilla extract or, even better, vanilla paste – those tiny vanilla seeds add both intense flavor and visual appeal. A tiny pinch of salt is vital; it enhances all the other flavors, preventing the truffles from tasting flat.
**The Process:**
1. **Combine & Hydrate:** In a medium bowl, thoroughly mix the shredded coconut, melted coconut oil, your chosen sweetener, a splash of water, vanilla, and salt. It might seem a bit loose at first, but here's a pro tip: allow the mixture to rest for 5-10 minutes. This crucial resting period allows the dried coconut to absorb the moisture, resulting in a more cohesive and pliable mixture.
2. **Forming the Mounds:** Using a tablespoon or a small cookie scoop, portion out the coconut mixture onto a plate or baking sheet lined with parchment paper. Gently roll them into bite-sized mounds. Don't worry if they feel a bit fragile at this stage; they’re about to get a stability boost!
3. **The Freezer Firm-Up:** Place the plate into the freezer for 15-20 minutes. This step is non-negotiable! The cold temperature solidifies the coconut oil, transforming your delicate coconut mounds into firm, ready-to-dip centers. This prevents them from disintegrating when they meet the warm chocolate.
The Art of the Chocolate Coating: Melting, Dipping, and Setting
The perfect chocolate coating is what elevates these from simple coconut balls to true
mounds bar truffles. A rich, dark chocolate offers the ideal counterpoint to the sweet coconut, creating that classic flavor combination.
**Choosing Your Chocolate:**
For the most authentic experience, opt for a good quality dark chocolate, ideally 60-75% cacao. Dark chocolate provides a lovely bittersweet balance that complements the sweet coconut filling beautifully. While store-bought dark chocolate chips or bars are convenient and reliable for their melting properties, you could experiment with making your own raw chocolate coating for an even purer, less processed option. However, raw chocolate tends to be more delicate at room temperature, making store-bought a better choice when serving guests or at parties.
**Melting Techniques:**
There are several ways to achieve perfectly melted, smooth chocolate:
* **Double Boiler:** This is the classic method. Place chocolate chips or chopped chocolate in a heatproof bowl set over a saucepan of simmering water, ensuring the bowl doesn't touch the water. Stir gently until melted and smooth.
* **Microwave:** A quick option! Heat chocolate in a microwave-safe bowl in 30-second intervals, stirring thoroughly after each, until smooth. Be careful not to overheat, which can cause the chocolate to seize.
* **Oven Method:** For those without a microwave, a simple trick is to place dark chocolate chips in an oven-safe bowl and pop them into a 400-degree Fahrenheit oven for about 5 minutes. The residual heat will continue to melt them; just stir well afterward until completely smooth.
**Dipping for Perfection:**
Once your coconut mounds are solid from the freezer and your chocolate is perfectly melted, it's time for the fun part: dipping!
1. **Preparation:** Have your melted chocolate ready in a deep, narrow bowl, and line another plate or tray with parchment paper for the dipped truffles.
2. **The Dip:** Using a fork or a dipping tool, carefully drop one frozen coconut mound into the melted chocolate. Spoon chocolate over it to ensure it's fully coated. Lift it out, allowing any excess chocolate to drip back into the bowl. Gently scrape the bottom against the edge of the bowl to remove any drips, then place it onto your parchment-lined plate.
3. **Full Coverage (Optional):** If you want the bottom of your truffles to be fully coated as well, allow the first chocolate coating to set in the freezer for about 10 minutes. Then, you can either dip the bottoms again or carefully spoon chocolate over the exposed areas before returning them to the freezer to fully set.
4. **Quick Chill:** Once all truffles are coated, place them back in the freezer for another 10-15 minutes to allow the chocolate to firm up and create that satisfying snap.
Beyond the Basic: Customizing Your Mounds Truffles
While the classic
mounds bar truffles are undeniably delicious, the beauty of homemade treats lies in the endless possibilities for customization. Unleash your inner chocolatier and personalize your batch!
**The Almond Joy Twist:**
For those who appreciate the best of both worlds – the Mounds texture with an Almond Joy essence – consider incorporating almond meal into your coconut filling. Simply add a tablespoon or two of fine almond meal to the coconut mixture, infusing a subtle nutty flavor that perfectly complements the coconut and chocolate. If you don't have almond meal, a few drops of almond extract can also do the trick. This clever twist transforms your truffles into something truly special, marrying two beloved candy bar experiences. For a deeper dive into this delightful fusion, check out our guide on
Gluten-Free Nutty Mounds Truffles: Almond Joy Flavor Blend.
**Nut-Free Alternatives:**
If allergies are a concern or you simply prefer to keep them nut-free, almond meal can be easily omitted. The recipe stands perfectly on its own without it!
**Flavor Infusions:**
* **Citrus Zest:** A teaspoon of finely grated orange or lime zest adds a bright, refreshing counterpoint to the rich chocolate and coconut.
* **Spices:** A pinch of cinnamon, cardamom, or even a tiny bit of cayenne pepper can add unexpected warmth and depth.
* **Espresso:** A quarter teaspoon of instant espresso powder mixed into the coconut filling enhances the chocolate flavor without making the truffles taste like coffee.
**Toppings and Decorations:**
Once your truffles are dipped, but before the chocolate fully sets, you can add various toppings for extra flair:
* **Flaky Sea Salt:** A sprinkle of sea salt provides a delightful textural contrast and enhances both the sweet and bitter notes.
* **Toasted Coconut Flakes:** For an extra coconut boost and a lovely crunch.
* **Sprinkles:** Fun for parties or holidays!
* **White Chocolate Drizzle:** A decorative touch that adds visual appeal.
* **Finely Chopped Nuts:** If not adding almond meal, a sprinkle of finely chopped almonds or pecans on top can be delicious.
**Dietary Adaptations:**
These truffles are naturally gluten-free. For a vegan version, simply ensure you're using maple syrup instead of honey and verify that your dark chocolate is dairy-free. With a few thoughtful swaps, you can cater to various dietary needs without sacrificing flavor.
Serving, Storing, and Sharing Your Decadent Truffles
Once your easy
mounds bar truffles are complete, the anticipation of enjoying them is almost as good as the first bite!
**The Best Way to Serve:**
For optimal texture and flavor, these truffles are best served slightly chilled. The cool temperature ensures the coconut oil remains firm, providing a satisfying bite, and the chocolate coating retains its crisp snap. Remove them from the refrigerator or freezer a few minutes before serving to allow them to soften just slightly.
**Storage Solutions:**
Due to the coconut oil content, these truffles need to be stored in the refrigerator. Place them in an airtight container, where they will maintain their freshness and deliciousness for up to 1-2 weeks. You can also freeze them for longer storage, up to 1-2 months. If freezing, layer them between parchment paper in an airtight container. When ready to enjoy, simply transfer them to the refrigerator or let them sit at room temperature for a few minutes before serving. An interesting note from our reference context is that the texture of homemade coconut candies can actually improve over a day or two as the dried coconut absorbs more moisture, so making them slightly ahead of time can be a bonus!
**Perfect for Gifting:**
These delightful truffles make exceptional homemade gifts. The recipe is easily doubled or tripled, allowing you to whip up a large batch for multiple recipients. Package them in small decorative boxes, tie with a ribbon, and you have a thoughtful, personalized present that's sure to impress. For more ideas on presenting and personalizing your homemade treats, explore our guide on
Homemade Mounds Truffles: Simple Recipe for Custom Gifting.
The ability to control the ingredients means you can create a truly wholesome treat, free from unwanted additives often found in commercial candies. Whether you're making them for a party, a quiet treat, or a heartfelt gift, these homemade truffles are a testament to how easy and rewarding it can be to create confectionery magic in your own kitchen.
In conclusion, these easy
mounds bar truffles offer a remarkable blend of simplicity, nostalgia, and customizable deliciousness. They're a testament to the fact that satisfying your sweet tooth doesn't have to be complicated or messy. With their rich chocolate exterior and tender, flavorful coconut interior, these homemade gems are not just a quick fix but a truly gratifying culinary experience. So, gather your ingredients, embrace the joy of creation, and prepare to indulge in the ultimate chocolate-coconut bliss!